13. Executing Tester-Generated Test Suites#
Once created with Reactis, test suites may be executed in a variety of different ways. You may:
Load them into Reactis Simulator and run them.
Load them into the Simulink simulation environment of The MathWorks and run them, with or without the help of the graphical
rsRunTestsre tool included in the Reactis distribution.Export them as CSV files for processing by other tools.
This chapter describes these options in more detail.
13.1. Executing Test Suites Using Reactis Simulator#
Reactis Simulator includes facilities for running Tester-generated tests on Simulink / Stateflow models. These were detailed in the Reactis Simulator chapter. Here we briefly outline several of the most common use cases for executing tests in Simulator. Note that in all cases, Reactis will check the values stored in test suites for outputs and test points against those computed by the model. Also recall from the Reactis Simulator chapter, that Simulator offers many different ways to track data item values and coverage as tests execute.
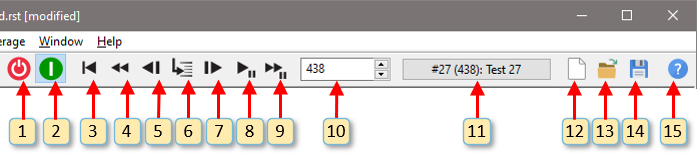
Fig. 13.1 The Reactis Simulator toolbar#
The following uses Figure 13.1 to explain the steps needed to load and run a .rst file named cruise.rst.
Select File > Open Model… and use the resulting dialog to select
cruise.slxfor loading.Click button 2 to enable Simulator.
Click button 13 and use the resulting dialog to select
cruise.rstfor loading. The name of the file will be shown in the title bar of the Simulator window, and the tests will be listed in Source-of-Inputs dialog (window item 11).Once a test suite is loaded, some possible ways of running tests include:
To run a single test:
a. Click on the Source-of-Inputs dialog button (window item 11).
b. Select the test to be run. It will appear in the Source-of-Inputs dialog button.
c. Use buttons 3–9 to step through the test as described in the Labeled Window Items section. The inputs for each simulation step will be taken from the test and the values computed for test points and harness outputs will be compared against those stored in the test suite.
To run all tests, one after another:
a. Click on the Source-of-Inputs dialog button (window item 11).
b. Click the All button at the bottom left of the dialog.
c. Use buttons 3–9 to run the tests as described in the Labeled Window Items section. The inputs for each simulation step will be drawn from the tests (beginning with Test 1) and the values computed for test points and harness outputs will be compared against those stored in the test suite. When each test is completed, the simulation is “reset” so that the next test begins in the initial state of the model. Coverage information, however, is not reset, so the final cumulative statistics show the set of targets covered by any test in the suite.
To run all tests and generate an HTML report:
a. Click on the Source-of-Inputs dialog button (window item 11).
b. Click the All button at the bottom left of the dialog.
c. Select Simulate > Fast Run with Report… The resulting report lists any runtime errors uncovered (divide-by-zero, overflow, memory errors, missing cases, assertion violations, etc.) or differences between outport values stored in the test suite and those computed by the model. If a runtime error is encountered, the remaining steps of the current test are skipped and Simulator continues execution with the following test. Optionally, you can also direct Reactis to include detailed coverage information (if and when each target was covered) in the report.
13.2. Executing Test Suites in Simulink#
Test suites generated by Reactis may also be used to guide simulations in The MathWorks’ Simulink environment. To run tests in Simulink, a test suite must first be exported into a format readable by MATLAB. Test suites may be exported from Reactis Simulator (described in more detail in the Reactis Simulator chapter) by selecting the Test Suite > Export… menu item. For running tests in Simulink, Reactis supports three export formats which are listed in the export dialog as follows.
MATLAB script (.m)
MATLAB binary data (.mat)
MATLAB binary data for FromWorkspace blocks (.mat)
In all cases, when executed, the file initializes matrices that can be used as inputs to drive a Simulink simulation. We describe four ways to load an exported test suite into Simulink and then read input values from the tests during a simulation. The four methods are listed below along with the export file formats with which they work.
Method |
Compatible File Formats |
|---|---|
Using the |
1, 2 |
Using the Simulation Parameters Dialog. |
1, 2 |
Editing the |
1 |
Replacing harness inports with ‘FromWorkspace’ blocks. |
3 |
Note
When executing Tester-generated test suites in Simulink, interpolation must be turned off for all top-level inports of the model. You may turn interpolation off for top-level ports in one of two ways:
By using the
interpolateoffutility distributed with Reactis. The utility is invoked from the MATLAB command line. If given a filename as an argument,interpolateoffwill open the specified model file and set the inports to not interpolate. When invoked with no argument the current model is modified. If the model does not have any top-level input ports or all top-level input ports are already set to non-interpolate, the script does nothing. To make the changes permanent, the model must be saved (to a different file if you wish to retain the old settings).By right-clicking on each port in a Simulink window, selecting block parameters, and making sure the interpolate check box is not checked.
13.2.1. Executing Tests in Simulink with the rsRunTests Utility#
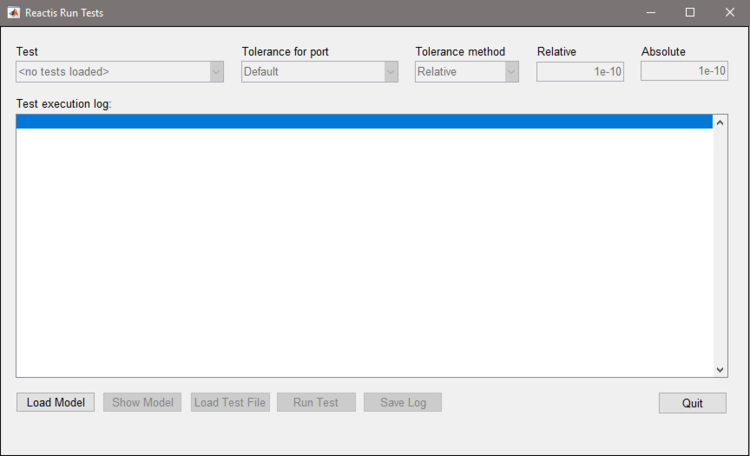
Fig. 13.2 The rsRunTests utility for running test suites in Simulink.#
The rsRunTests tool in the Reactis distribution can be used as follows to run Reactis-generated tests from within Simulink:
Ensure that the Reactis MATLAB API folder has been added to the MATLAB path. This can be done by clicking the Set Path button in the MATLAB toolbar or from the MATLAB command line with:
>> addpath('C:\Program Files\Reactis V2025\lib\api\MATLAB\reactis')Start the GUI by entering
rsRunTestson the MATLAB command line. You will be presented with the window shown in Figure 13.2.Use the Load Model button to specify a Simulink model to load.
You may now click the Show Model button to view the loaded model.
Use the Load Test File button to specify a
.mfile or a.matfile (exported by Reactis) to load.Select a test in the drop-down box.
Click the Run Test(s) button to execute the selected test.
Click the Save Log button to save a copy of the contents of the Test execution log to a user-selected text file.
Any significant differences between the model’s outputs as computed by Reactis (and stored in the test suite) and those computed by Simulink will be listed in the log. A difference between outputs is listed if it exceeds the tolerance specified for the output. The Tolerance pull-down may be used to manipulate tolerances. The menu includes a Default entry as well as an entry for each harness outport. If the setting for an outport is Inherit the Default tolerance is used.
The initial values of the Tolerance pull-down are imported from the test suite (which was exported by Reactis). You may manipulate both the default and port-level tolerances for a model from the Reactis Info File Editor and Reactis will store these values in the .rsi file associated with the model. Reactis will then export the tolerances from the .rsi file to exported suites (.m or .mat files) for use by rsRunTests.
The process used to flag differences is described in the Outports Pane section.
13.2.2. Executing Tests in Simulink with the Simulation Parameters Dialog#
An alternative to the rsRunTests utility is running the tests manually within MATLAB as follows.
Load the
.mfile (or.matfile) by entering the file name without the.m (.mat)file suffix on the MATLAB command line. [1] For example:
>> cruiseTests
Load the model in Simulink and select the Simulation > Model Configuration Parameters… menu item.
In the Solver pane of the Configuration Parameters dialog, adjust the simulation time to use the entire test. By convention, Reactis stores the start and stop times for test n, where n is the number of the test (1, 2, 3, etc.), in variables named
testn_startandtestn_stop, respectively.In the Data Import/Export pane of the Configuration Parameters dialog, enable the Input check box and enter the name of the test matrix in the text box next to it. The test matrices in a Reactis-exported
.mfile (.matfile) are by convention namedtest1,test2,test3, … For example, entertest1in the text box if you want to execute the first test.Start a simulation run in Simulink. The simulation inputs will be taken from the specified test.
13.2.3. Running Tests in Simulink by Editing the .m file#
This method also allows tests to be run from within MATLAB. The difference with the previous method is that it allows the “batch processing” of multiple tests.
Open the
.mfile in the MATLAB editor (by selecting File > Open… from the top-level MATLAB window).In line 2 of the
.mfile make suremodelNameis assigned the name of the model you would like to simulate.Scroll to the bottom of the file and you will find a number of commented-out lines, one for each test. Uncomment the lines of tests you want to execute and save the file.
Load the file by entering its name on the MATLAB command line, and all uncommented tests will be executed.
13.2.4. Running Tests in Simulink by Replacing Top-Level Inports with FromWorkspace Blocks.#
Executing tests exported in format 3 requires some modifications to be made to a model before the tests may be run in Simulink. For each test in a test suite, the exported file contains a variable named testn (where n is the test number). The variable stores an array of structures ready for use in a FromWorkspace block. Each element of the array stores the values that one inport assumes during the test. A model may be modified to use these structures to execute test n as follows:
Load the model in Simulink.
For each top-level inport,
- Delete the inport and replace it with a FromWorkspace block.
- Double-click on the new FromWorkspace block.
- In the Data field, enter testn(i) (where n is the test number and i is the inport number. For example test3(5) specifies test 3, inport 5).
- Uncheck the Interpolate field.
- Select Holding final value in the Form output after final value by field.
In the Solver tab of the Simulation Parameters dialog, adjust the simulation time to use the entire test. By convention, Reactis stores the start and stop times for test n, where n is the test number, in variables named
testn_startandtestn_stop, respectively.Start a simulation run in Simulink. The simulation inputs will be taken from the specified test.
13.3. Executing Test Suites on Source Code#
Tester-generated test suites may also be run on source-code implementations of Simulink / Stateflow models; this feature helps automate the important task of determining whether deployed code will conform to models. Reactis currently supports several methods for running tests on source.
- Via Reactis Simulator (in Reactis for C Standalone)
The standalone version of Reactis for C (not the Reactis for C Plugin) lets you test and validate standalone C code that is not a part of a Simulink model. Reactis for C shares the same test suite format (.rst) with Reactis for Simulink which greatly simplifies back-to-back testing of C code (foo.c) against a model (foo.slx). To do so:
Generate a test suite foo.rst from foo.slx with Reactis for Simulink.
Load foo.c in Reactis for C
Start Simulator (in Reactis for C) and load foo.rst
Select Simulate > Fast Run with Report… to execute the tests on the C code. Outputs computed by the C code will be compared against those stored in the test suite (which came from the model) and any differences are described in the generated report.
- Via Reactis Simulator (in Reactis for Simulink)
You may use the S-function feature of MathWorks’ Simulink environment to embed your source code inside a Simulink block. This wrapper model may then be loaded and run in Simulator with differences between S-function outputs and outputs stored in tests flagged. This is especially useful when using the Reactis for C Plugin, since it allows inspection of the C code as the tests execute and tracking the coverage of the C code.
- Via Simulink:
You may use the S-function feature of MathWorks’ Simulink environment to embed your source code inside a Simulink block. Then, as described in the Executing Test Suites in Simulink section, a number of methods for executing tests are available, including the
rsRunTestsutility provided by Reactis which will execute the tests and automatically flag any differences between the values stored in the tests and those computed by Simulink.- Via user-written test harnesses:
Reactis is also capable of outputting a test suite as a comma separated value (CSV) file for easy processing by external tools. Test steps are listed in an easy-to-process fashion. You may write your own test harnesses to read these files, run your program on the test data, and compare the outputs of the program to those stored in the tests.
Both the .m files and CSV files may be obtained using the Reactis Simulator export facility; see the Exporting Test Suites section for more on how to do this.
In order to write test harnesses that process Reactis-exported CSV files, one must know about the format of these files. The figure below contains a partial listing of a .csv file generated from the cruise-control example used in the Getting Started with Reactis chapter. See the Exporting Test Suites section for a description of the CSV file format.
onOff,accelResume,cancel,decelSet,brake,gas,inacThrDelt,drag,___t___,active,thrDelt,speed,"|InitialSpeed"
0.0,1.0,1.0,1.0,0.0,1.0,-0.1,-0.01,0.0,0.0,0.0,0.0,0.0
1.0,1.0,0.0,1.0,1.0,1.0,0.0,-0.00959914797712953,1.0,0.0,0.0,0.0,0.0
0.0,1.0,0.0,0.0,1.0,0.0,0.1,-0.00866942376836091,2.0,0.0,0.0,0.0,0.0
1.0,1.0,1.0,1.0,1.0,0.0,0.1,-0.00829318652470756,3.0,0.0,0.0,0.191330576231639,0.0

1.0,1.0,1.0,0.0,0.0,1.0,0.1,0.01,0.0,0.0,0.0,50.0,50.0
0.0,1.0,0.0,1.0,1.0,0.0,0.0,0.00942639853457365,1.0,0.0,0.0,50.21,50.0
0.0,0.0,0.0,1.0,1.0,1.0,-0.1,0.00884905410912495,2.0,0.0,0.0,50.2194263985346,50.0

0.0,0.0,1.0,1.0,0.0,1.0,0.1,-0.01,0.0,0.0,0.0,4.21309604376837,4.21309604376837
0.0,1.0,1.0,1.0,0.0,1.0,-0.1,-0.00955227172719837,1.0,0.0,0.0,4.40309604376837,4.21309604376837
1.0,1.0,1.0,0.0,0.0,0.0,0.1,-0.00866896857231075,2.0,0.0,0.0,4.19354377204118,4.21309604376837
0.0,1.0,1.0,1.0,0.0,0.0,0.1,-0.00855659477502143,3.0,0.0,0.0,4.38487480346887,4.21309604376837
1.0,0.0,1.0,0.0,0.0,0.0,-0.1,-0.00773304191244197,4.0,0.0,0.0,4.57631820869384,4.21309604376837
0.0,0.0,1.0,1.0,0.0,1.0,0.1,-0.00700061209826044,5.0,0.0,0.0,4.3685851667814,4.21309604376837

0.0,1.0,0.0,1.0,0.0,1.0,0.1,0.0,0.0,0.0,0.0,22.8683123376438,22.8683123376438