19. Linking with Reactis for C#
When generating C code from a model, Simulink Embedded Coder adds comments to link the C code back to the model. Reactis now leverages this instrumentation to help you explore and co-simulate a model and the C code generated from it. Linking a Reactis for Simulink session with a Reactis for C session lets you:
Click on a model item (block or Stateflow state or transition) to highlight corresponding C code,
Click on a line of C code to highlight corresponding model items,
Set a breakpoint in the model to set breakpoints on on corresponding C code,
Set a breakpoint on a line of C code to set breakpoints on corresponding model items.
19.1. Prerequisites#
To use the linking feature, Reactis V2023.2 or later and Reactis for C V2023 or later are required. The C code must have been generated from the model using Simulink Embedded Coder. When generating code, the following settings must be set in the Comments tab of the model’s code generation settings:
Trace to model using must be set to Block path.
Stateflow object comments must be checked.
19.2. Enabling Linking with Reactis for C#
In both Reactis for Simulink and Reactis for C, linking must first be enabled before it can be used. To enable linking:
In Reactis for Simulink, select File > Global Settings, then in the General tab, make sure the Allow connections between Reactis for Simulink and Reactis for C box is checked. You may additionally configure the range of TCP ports used for the communication. The setting Invoke Reactis for C version lets you configure which version of Reactis for C will be invoked by Reactis for Simulink.
In Reactis for C, select File > Global Settings, then in the General tab, make sure Allow connections between Reactis for Simulink and Reactis for C is checked. The specified port range should match the one you gave for Reactis for Simulink.
Reactis for C and Reactis for C must be restarted to make these changes take effect.
19.3. Establishing a link with Reactis for C#
A link can be initiated either from Reactis for Simulink or Reactis for C.
19.3.1. Invoking Reactis for C from Reactis for Simulink#
This method requires that a Reactis for C build file (*.rsm) and harness has already been created for the C code corresponding to the model. If the build file does not yet exist, start Reactis for C, set up the build file and then establish a connection.
To invoke Reactis for C from Reactis for Simulink, select the File > Invoke Reactis for C menu item. This will open a file selection dialog to select the build file to open in Reactis for C. Once a build file is selected, Reactis for C will start, load the C code from the build file and connect to Reactis for Simulink. Once the connection is established (“[connected]” is shown in the title bar), you can use the features outlined in Using the Link.
If the Invoke Reactis for C menu entry is not present, linking between Reactis for Simulink and Reactis for C is not enabled. Please follow the steps in Enable Linking with Reactis for C to enable it. Note that the Invoke Reactis for C menu entry is disabled if either no Reactis for C version is selected in the File > Global Settings dialog or no model is loaded in Reactis for Simulink.
19.3.2. Connecting to Reactis for Simulink from Reactis for C#
Use this method if either Reactis for C is already running or you do not yet have a build file (*.rsm) for your C code.
To connect from Reactis for C to Reactis for Simulink, select the File > Connect to Reactis for Simulink menu item. If that item is not present, make sure that linking is enabled (see section Enable linking with Reactis for C). Note that a build file must be loaded for this menu item to be enabled.
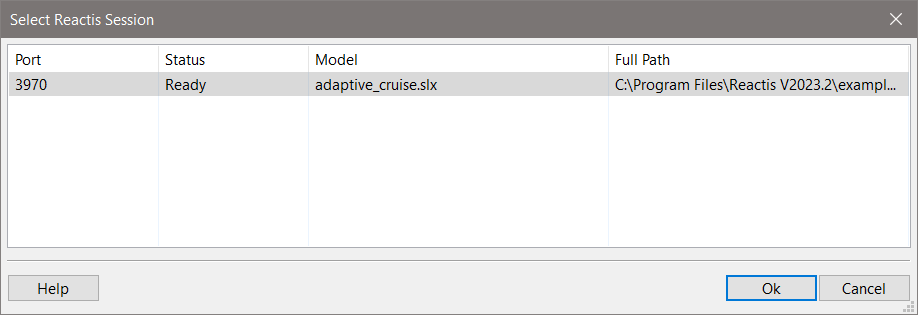
Fig. 19.1 Selecting a Reactis instance to link with.#
If the currently loaded C code was not generated by Embedded Coder or the comments generated by Embedded coder can not be read by Reactis, a message box will come up saying that linking is not available. Otherwise, Reactis for C will bring up the dialog shown in Figure 19.1. The dialog lists all running instances of Reactis for Simulink for which linking is supported and enabled. The dialog contains four columns:
- Port.
Identifies the TCP port number on which this instance is listening (as configured in its File > General Settings dialog).
- Status.
This column will have one of the following values
- No model loaded
No model is currently loaded in this instance.
- Busy
This instance is already connected to a different instance of Reactis for C.
- Ready
This instance is ready to connect.
- Model.
Shows the name of the model currently loaded in the session
- Full Path.
Shows the full path of the model currently loaded in the session
If a Reactis session is listed in which a model is loaded whose base file name is the same as the base file name of the build file loaded in Reactis for C, then that session will be automatically selected. Click Ok to connect. If no such session is found, you need to manually select which session to connect to and then click Ok.
19.4. Using the Link#
Once the connection is established, the functionality explained in the sections below is available.
19.4.1. Highlighting C Code Corresponding to Model Elements#
In Reactis for Simulink, clicking on a block in the model will highlight the block yellow and, simultaneously, Reactis for C will highlight in yellow any comment line in the C code that mentions the highlighted block. Reactis for C will automatically scroll to the first instance of such a comment.
The same is done when clicking on a Stateflow item such as a state or transition.
If no corresponding comment can be found then nothing is highlighted. Note that while Embedded Coder creates comments for the vast majority of blocks and Stateflow items, some blocks (for example virtual blocks such as From/Goto) or Stateflow item will not have a corresponding comment and therefore cannot be highlighted in the C code.
To remove highlighting, click in empty space outside of any block or Stateflow state.
19.4.2. Highlighting Model Elements Corresponding to C Code#
In Reactis for C, clicking on a comment line in C code that mentions a model element will highlight the corresponding element in the model in Reactis for Simulink.
Clicking on a line of C code will highlight all model elements mentioned in the C code comment directly above the clicked line.
In either case Reactis for Simulink will automatically select the system containing the highlighted item.
19.4.3. Breakpoints#
If a breakpoint is added in the model, Reactis for C will automatically set a breakpoint on the first line of C code below any comment mentioning the model item on which the breakpoint was set.
If a breakpoint is added in the C code, Reactis for Simulink will automatically set a breakpoint on all model items mentioned in the C code comment directly above the clicked line.
Note that due to the way Embedded Coder generates C code it is possible that a single block is mentioned in multiple different sections of C code. This means that a single breakpoint in the model may produce multiple breakpoints in the C code.
Similarly, a single section (or sometimes a single line) of C code may combine multiple model blocks, leading to multiple breakpoints set in the model for a single breakpoint in the C code.
Like adding, removing a breakpoint in C code or model will remove the corresponding breakpoints in the linked session.
19.4.4. Simulator State#
When you enable or disable Simulator in Reactis for Simulink, a linked session of Reactis for C will also enable or disable Simulator. Similarly, whenever you enable or disable Simulator in Reactis for C, a linked session of Reactis for Simulink will enable or disable Simulator.
19.5. Example Model and Code#
A sample model and corresponding code is included in the Reactis for Simulink distribution to facilitate testing the linking of Reactis for Simulink to Reactis for C.
19.5.1. Initial setup#
Install Reactis for Simulink V2023.2 or later and Reactis for C V2023 or later
Start Reactis for Simulink, select Global Settings > General, then: a. Make sure the Allow connections between Reactis for Simulink and Reactis for C check box is checked. b. Set Invoke Reactis for C version to the version of Reactis for C you have installed (V2023 or later). c. Click Ok d. Exit Reactis for Simulink
Start Reactis for C, select Global Settings > General, then: a. Make sure the Allow connections between Reactis for Simulink and Reactis for C check box is checked. b. Click Ok c. Exit Reactis for C
19.5.2. Usage#
Start Reactis for Simulink
Select File > Open Model
Select
{REACTISROOT}\examples\R2020b\adaptive_cruise\adaptive_cruise.slxand click OkSelect File > Invoke Reactis for C
Select
{REACTISROOT}\examples\R2020b\adaptive_cruise\embedded_coder\adaptive_cruise.rsmand click OkReactis for C will start and automatically link to Reactis for Simulink
You are now ready to try out the features listed in the Using the Link section above.
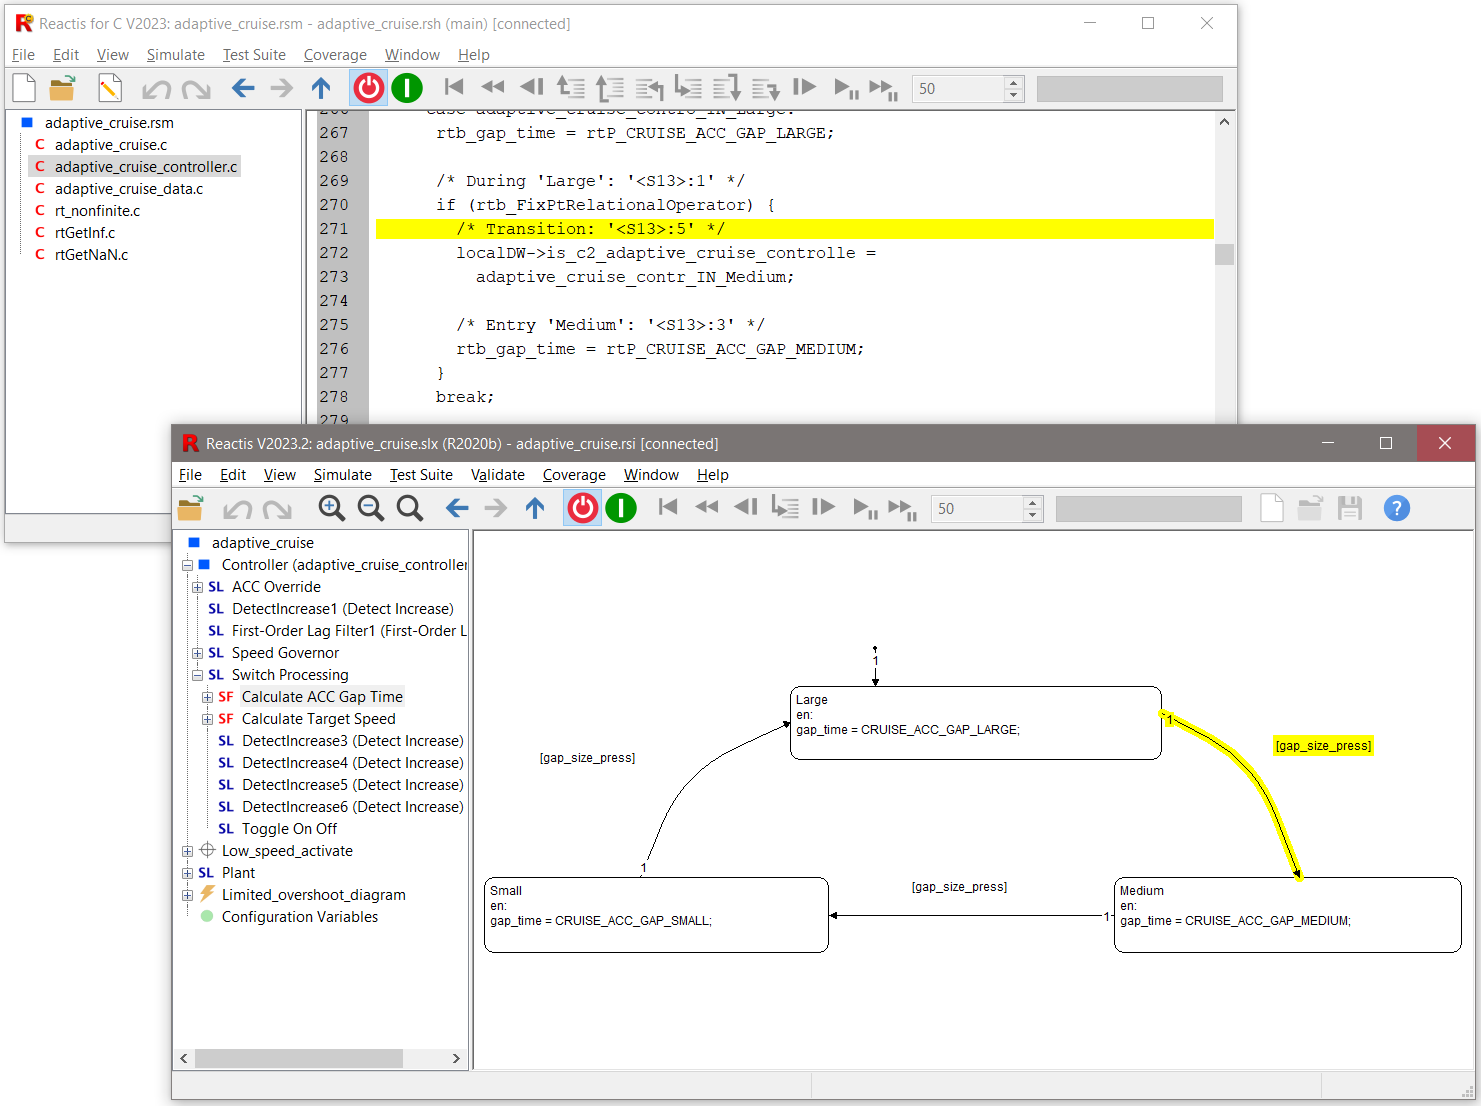
Fig. 19.2 Code highlighting after clicking on a Stateflow transition.#
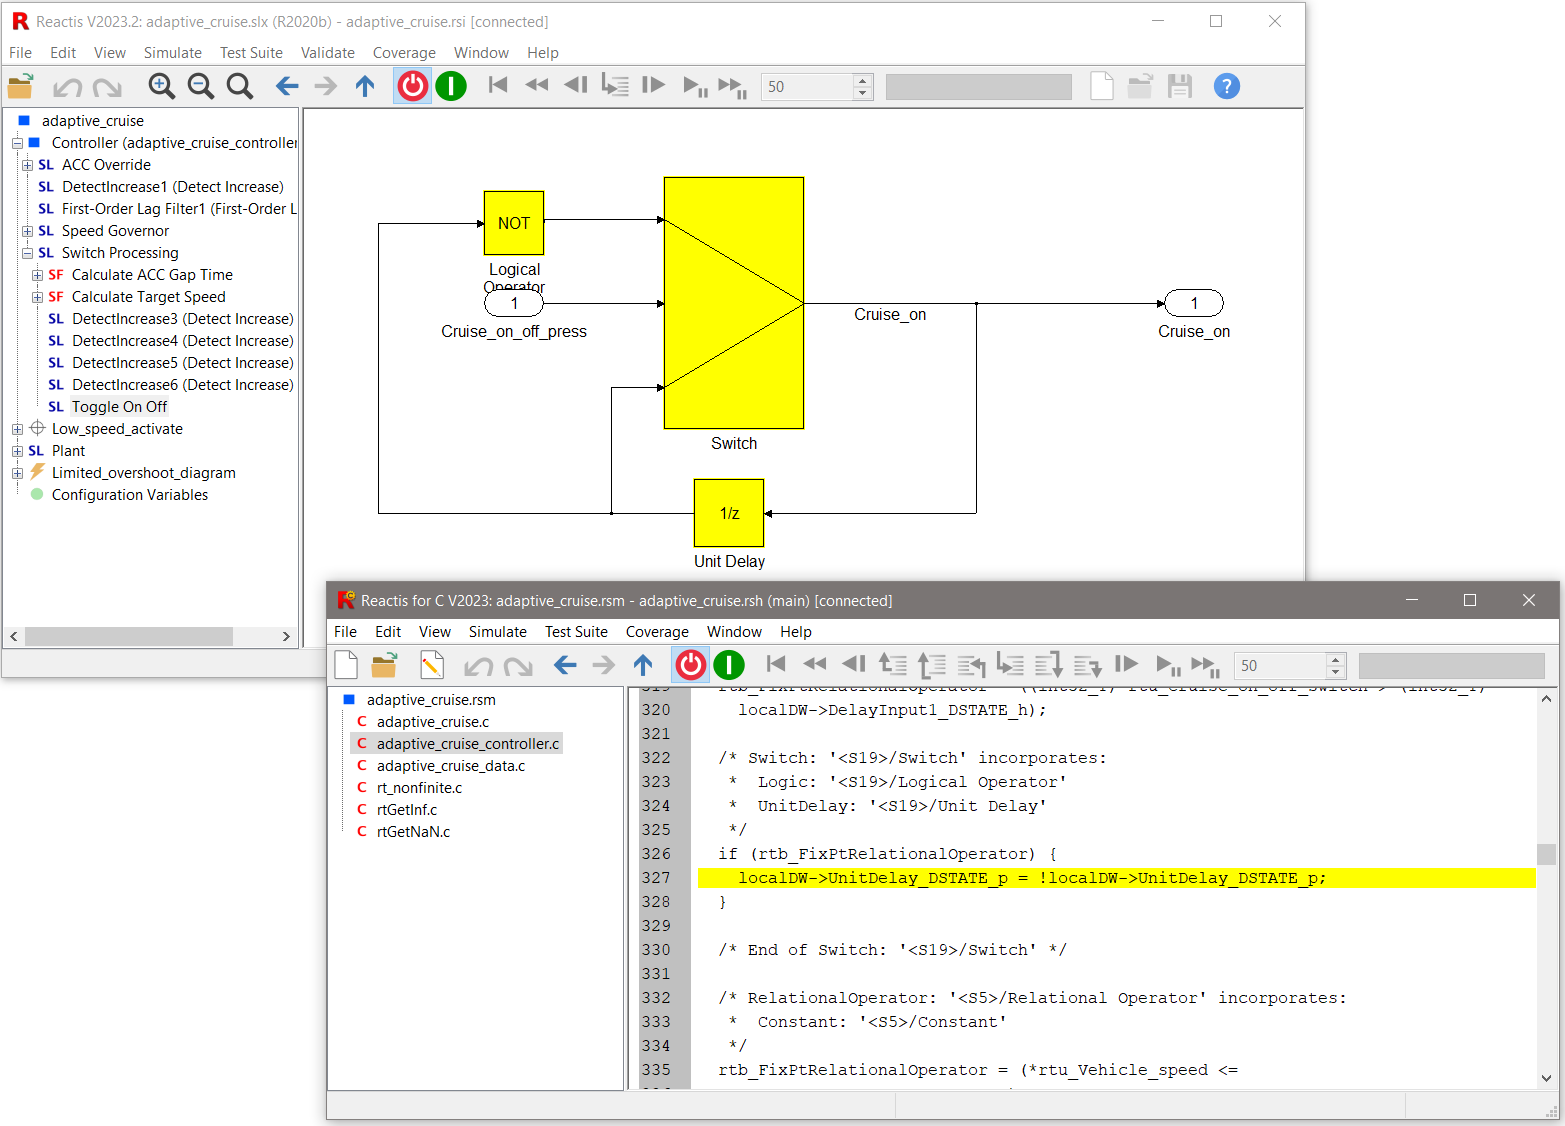
Fig. 19.3 Model highlighting after clicking on a C code line affecting multiple model blocks.#